Selecting Your Adobe Photoshop CS3 and Printer Driver Settings
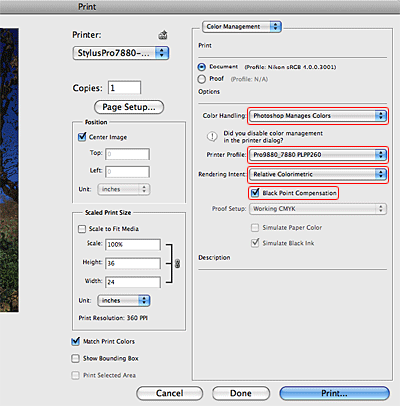
- Open the File menu in Adobe Photoshop and select Print.
- Under Color Handling, choose Photoshop Manages Color.

- Open the Printer Profile list and select the profile for your printer that matches the paper you’re printing on. (Do not choose Working RGB or Adobe RGB as these profiles are not usable by your Epson printer.) Some media types, such as Exhibition Fiber Paper, require you to download additional profiles.
Note: If you are printing on Epson media and do not know which profile to select for the media you're using, follow steps 6 through 12 below to identify the profile, then return to step 3 and select your profile in the Printer Profile list. Continue with step 4. - Select Relative Colorimetric as the Rendering setting.
Note: If your image contains very saturated colors, select Perceptual. This reduces the color saturation so that the colors fit within the printer's color gamut. - Select the Black Point Compensation checkbox, if available
- Click the Print button. Your printer driver's Print window appears.
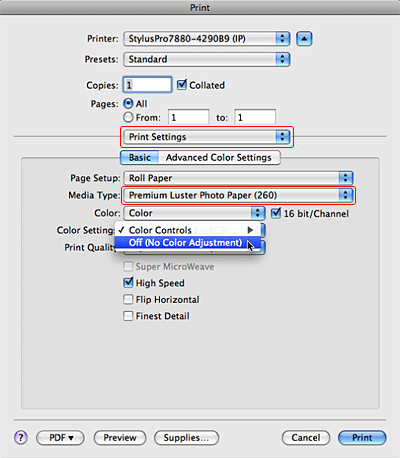
- Select your printer from the Printer menu.

- If necessary, click the
 button to expand the Print window.
 - Select Print Settings from the pop-up menu.

- Select the Media Type setting for the paper you'll use for the print. This should match the type of paper for the profile you selected in the previous Print window.
- Select Off (No Color Adjustment) for Color Settings.
Note: Make sure that you select Off (No Color Adjustment). If you don’t, the printer driver will apply additional correction to the image data, producing inaccurate results. - To identify the profile that matches each of the media types listed, click on Advanced Color Settings. Your currently selected media type and the matching ICC profile will be displayed. Click on Basic when done.

- Click Print to begin printing.