I see a blank Scanner Settings window when I start Epson Scan 2. What should I do?
-
Close the Scanner Settings window and follow the steps below for your connection type.
USB Connection
- Make sure you restarted your computer after installing the product software.
- Turn off your product, and then turn it back on.
- Make sure your product is connected to your computer or USB hub. Start Epson Scan 2. If you see your product in the Scanner Settings window, the problem is solved. If you see a blank Scanner Settings window, close the window and go to the next step.
Note: If your product is connected to a USB hub, make sure the hub has its own power source.
- Do one of the following:
- If your product is connected to a USB hub, connect the USB cable directly to your computer instead. Start Epson Scan 2. If you see your product in the Scanner Settings window, the problem is solved. If you see a blank Scanner Settings window, close the window and go to the next step.
- If your product is not connected to a USB hub, go to the next step.
- Make sure you are using the USB cable supplied with your product. Using any other USB cable could cause fire, electrical shock, or injury. Start Epson Scan 2. If you see your product in the Scanner Settings window, the problem is solved. If you still see a blank Scanner Settings window, contact Epson Support.
Ethernet (with Optional Epson Network Scan Module)
- Make sure your product is connected to the same network as your computer and start the Epson Scan 2 Utility. The Scanner Settings window appears again.
- Click Enable Editing or
 and click Yes on the screen that appears. If necessary, enter the administrator password and click OK.
 Note: If you do not see the Enable Editing button, run the Epson Scan 2 Utility as the administrator. Navigate to the shortcut for the Epson Scan 2 Utility, right-click the shortcut, and then click Run as administrator.
- Click Add or +. Make sure your product is selected as the Model in the screen that appears.
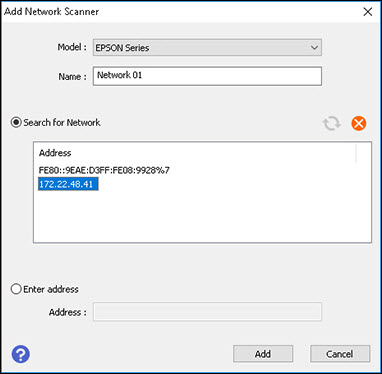
- Select the IP address for your product.
Note: If nothing appears in the Search for Network box, make sure your product is connected to the same network as your computer. If your product is connected to the same network and the box is still blank, contact Epson Support.
Note:If you don't know the IP address, you can check the Epson Network Interface Unit or use EpsonNet Config to find it. You can download EpsonNet Config from the Downloads tab on your product's support page.
After EpsonNet Config is installed on your computer, do the following:
- Windows 10: Click
 > EpsonNet > EpsonNet Config.
 - Windows (other versions): Click
 or Start, and select All Programs or Programs. Select EpsonNet > EpsonNet Config > EpsonNet Config.
 - Mac: Open the Applications folder and select Epson Software > EpsonNet > EpsonNet Config > EpsonNet Config.
- Windows 10: Click
- Click Add. Your product appears in the Scanner Settings window.

- Click OK.