I am having trouble connecting to the memory card reader in the product over a network connection. What should I do?
-
Before you can access the memory card, make sure your all-in-one is connected to the network and the printer software is installed on the computer. Also disconnect any devices you may have connected to the
 USB port on the front of the all-in-one. Then follow these steps:
- Insert a memory card in your all-in-one's memory card slot.
Note: Make sure you're using a compatible memory card and have inserted only one card into the all-in-one. - Do one of the following:
- Windows:
Click Start or , then click My Computer or Computer. Double-click the removable disk icon for the memory card located on your network.
If you don't see the removable disk icon for the memory card, see below for setup instructions. - Macintosh:
Double-click the Memory Card application icon (see example icon below) on your desktop or in the location where you saved it. This icon should have been saved when you installed the printer software.
Caution: When you're done accessing the card over your network, do not drag the Memory Card application icon to the Trash. If you accidentally delete the icon or if you didn't install it during the initial setup, you'll need to reinstall it to be able to access memory cards over your network.
- Windows:
- Remove any memory cards inserted in the memory card slot.
- If necessary, press the Home button on the control panel to return to the Home menu.
- Select Setup.

- Press
 or
or  , then select Network Settings.
- Press or , then select File Sharing Setup.
- Select Network.
- Select the access level (Read Only or Read/Write) for the memory card reader.
Windows Vista or XP- Print a Network Status Sheet.
- Open Windows Explorer.
- Do one of the following:
Windows Vista: Select Map Network Drive from the toolbar. A Map Network Drive window appears.
Windows XP: Open the Tools menu and select Map Network Drive. A Map Network Drive window appears.
- Select the drive letter you want to assign to the network drive.
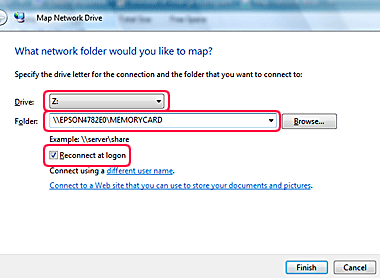
- Enter the following in the Folder field: \\servername\sharename
Refer to the printed network status sheet for the “servername' and “sharename”.- servername = Host Name or Printer Name (e.g., EPSONXXXXXX, where XXXXXX is the last 6 digits of the printer's MAC address)
- sharename = File Share Name (default is MEMORYCARD)
- Place a check mark in the box to the left of Reconnect at Logon.
- Click Finish.
If a Connect to EPSONXXXXXX window appears, select the appropriate user name and click OK to connect to the printer.
Mac OS X- Open the Hard Drive.
- Select Applications > EpsonNet Setup > EpsonNet Setup > Artisan 810 Network Setup. An EpsonNet Setup window appears.
- At the Firewall Warning screen, click Next.
- Select the printer you want to set up from the list, if necessary, and click Next.
- Select Computer settings only and click Next.

- Click Change Settings.

- Click Save to reinstall the application.

- Select where you would like to install the application, then click Save.

- Click Finish.
- Insert a memory card in your all-in-one's memory card slot.
Published: Dec 2, 2009
Was this helpful? Thank you for the feedback!