My Epson product software is missing after I upgraded to Windows 10. What should I do?
-
The upgrade may have uninstalled your Epson software. You need to install the software again. Do the following:
- Go to the Epson Support page and search for your product.
- Do one of the following:
- If your product is a printer or all-in-one (a printer with a scanner), select Downloads > Drivers and Utilities Combo Package. Follow the on-screen instructions to install the software.
- If your product is a scanner (with no printer), select Downloads > Drivers > Scanner Driver and EPSON Scan Utility or Scanner Driver and Epson Scan 2 Utility. Follow the on-screen instructions to install the software.
Note: If your scanner is connected to your computer or tablet with a wired or wireless connection, follow the instructions in one of the sections below, if necessary.
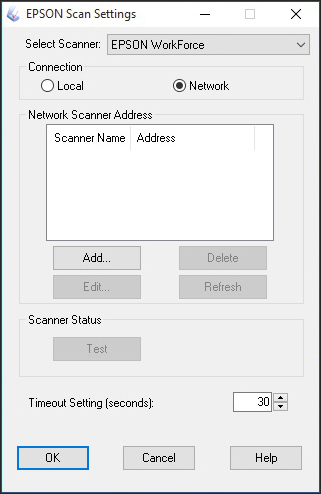
Configure Epson Scan for a Network Connection
- Select
 > EPSON > EPSON Scan Settings.
 - Select Network and select Add.

- Select the IP address for your product and select OK.

- Select OK again.
Configure Epson Scan 2 for a Network Connection
- Make sure your product is connected to the same network as your computer or tablet.
- Start Epson Scan 2. The Scanner Settings window appears.
- Select Enable Editing if you see it and select Yes on the screen that appears.
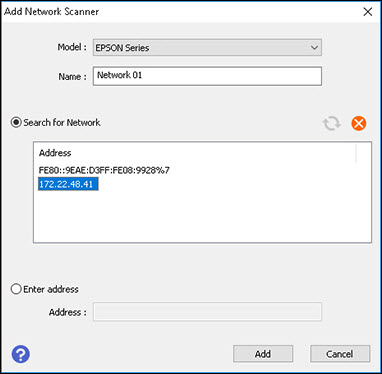
- Select Add. Make sure your product is selected as the Model in the screen that appears.

- Select the IP address for your product.
Note: If nothing appears in the Search for Network box, make sure your product is connected to the same network as your computer or tablet. If your product is connected to the same network but the box is still blank, contact Epson Support.
Note: If you don't know your product's IP address, you can print a network status sheet to obtain it.
- Select Add. Your product appears in the Scanner Settings window.

- Select OK.
Published: Aug 11, 2015
Was this helpful? Thank you for the feedback!