EN
Test FAQ: Is this a test?
-
EN
This is an h3 header
Test Test Test Test Test Test Test Test Test
======================================================
Paragraphs
Contact Epson support to obtain a replacement.
In the meantime, cover the open ink tank with a piece of tape to prevent dust or hair from getting inside it. Do not tilt or move the product while it is missing an ink tank cap; otherwise, ink may leak.
======================================================
Unordered List
Try the following:
- Make sure your system meets the requirements.
- Close any other programs, including screen savers and virus protection software, and install your product software again.
- If you see an error message or your software does not install correctly in Windows, you may not have software installation privileges. Contact your System Administrator.
- Make sure your product is turned on and the network cable is securely connected at both ends.
If these instructions did not solve your problem, contact Epson support.
======================================================
Unordered List with Nested Ordered List
To print from apps that open from the Start screen, do the following:
- Open the document, photo, or web page you want to print.
- Do the following to open the Devices charm:
- Touch: Swipe in from the right edge of the screen, then tap the
 Devices charm.
 - Mouse: Move the mouse pointer into the upper- or lower-right corner of the screen, then click the charm you want.
- Keyboard: Press the Devices charm key.
- Touch: Swipe in from the right edge of the screen, then tap the
- Tap the
 Print charm.
 - Tap or click your printer from the list.
- Choose your printing options, and tap or click Print.
======================================================
Unordered List with Nested Unordered List
To print from apps that open from the Start screen, do the following:
- Open the document, photo, or web page you want to print.
- Do one of the following to open the Devices charm:
- Touch: Swipe in from the right edge of the screen, then tap the Devices charm.
- Mouse: Move the mouse pointer into the upper- or lower-right corner of the screen, then click the charm you want.
- Keyboard: Press the Devices charm key.
- Touch: Swipe in from the right edge of the screen, then tap the
- Tap the Print charm.
- Tap or click your printer from the list.
Note: If your printer isn't listed, your app may not support printing or you haven't added a printer.
- Choose your printing options, and tap or click Print.
======================================================
Unordered List with Nested Note (nested in < li >)
To print from apps that open from the Start screen, do the following:
- Open the document, photo, or web page you want to print.
- Tap the Print charm.
- Tap or click your printer from the list.
Note: If your printer isn't listed, your app may not support printing or you haven't added a printer.
- Choose your printing options, and tap or click Print.
======================================================
Unordered List with Note (not nested in < li >)
To print from apps that open from the Start screen, do the following:
- Open the document, photo, or web page you want to print.
- Tap the Print charm.
- Tap or click your printer from the list.
Note: If your printer isn't listed, your app may not support printing or you haven't added a printer.
======================================================
Unordered List with Multiple Nested Unordered/Ordered Lists
Do the following:
- Turn on your printer and make sure it is connected to your Windows 10 computer.
- Turn on your computer.
- Select
 >
>  .
. - Select Devices > Printers & scanners > Add a printer or scanner.

- Do one of the following:
- If your printer appears in the window, select it and select Add device. Windows installs a driver for your printer, and your printer appears in the Printers & scanners list.
- If your printer does not appear in the window, select The printer that I want isn't listed > Add a local printer or network printer with manual settings > Next. Then do the following:
- Select Use an existing port, and in the drop-down list to the right, select USB001 (Virtual printer port for USB).

- Select Next.
- In the Manufacturer column, select EPSON. In the Printers column, select your printer.

Note: If you do not see your printer, select Windows Update. After Windows has finished updating the list of printers, select Epson in the Manufacturer column and select your printer in the Printers column.
- Select Next.
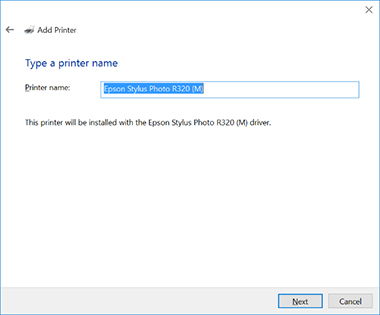
- Modify the printer name, if desired, and select Next to install the printer.
- Select Do not share this printer and select Next.
Note: Others on your network will still be able to find and use the printer after you select this option.
- Select Print a test page to make sure the printer installed correctly.
- Select Close, then Finish.
- Select Use an existing port, and in the drop-down list to the right, select USB001 (Virtual printer port for USB).
- Test Test Test Test Test Test Test Test Test
======================================================
Ordered List
To print from apps that open from the Start screen, do the following:
- Open the document, photo, or web page you want to print.
- Do one of the following to open the Devices charm:
- Tap the Print charm.
- Tap or click your printer from the list.
Note: If your printer isn't listed, your app may not support printing or you haven't added a printer.
- Choose your printing options, and tap or click Print.
======================================================
Ordered list with Nested Ordered List
To print from apps that open from the Start screen, do the following:
- Open the document, photo, or web page you want to print.
- Do the following to open the Devices charm:
- Touch: Swipe in from the right edge of the screen, then tap the Devices charm.
- Mouse: Move the mouse pointer into the upper- or lower-right corner of the screen, then click the charm you want.
- Keyboard: Press the Devices charm key.
- Touch: Swipe in from the right edge of the screen, then tap the
- Tap the Print charm.
- Tap or click your printer from the list.
Note: If your printer isn't listed, your app may not support printing or you haven't added a printer.
- Choose your printing options, and tap or click Print.
======================================================
Ordered list with Nested Unordered List
To print from apps that open from the Start screen, do the following:
- Open the document, photo, or web page you want to print.
- Do one of the following to open the Devices charm:
- Touch: Swipe in from the right edge of the screen, then tap the Devices charm.
- Mouse: Move the mouse pointer into the upper- or lower-right corner of the screen, then click the charm you want.
- Keyboard: Press the Devices charm key.
- Touch: Swipe in from the right edge of the screen, then tap the
- Tap the Print charm.
- Tap or click your printer from the list.
Note: If your printer isn't listed, your app may not support printing or you haven't added a printer.
- Choose your printing options, and tap or click Print.
======================================================
Ordered List with Nested Note (nested in < li >)
To print from apps that open from the Start screen, do the following:
- Open the document, photo, or web page you want to print.
- Tap the Print charm.
- Tap or click your printer from the list.
Note: If your printer isn't listed, your app may not support printing or you haven't added a printer.
- Choose your printing options, and tap or click Print.
======================================================
Ordered List with Note (not nested in < li >)
To print from apps that open from the Start screen, do the following:
- Open the document, photo, or web page you want to print.
- Tap the Print charm.
- Tap or click your printer from the list.
- Choose your printing options, and tap or click Print.
Note: If your printer isn't listed, your app may not support printing or you haven't added a printer.
If these instructions did not help, please contact Epson Support.
======================================================
Ordered List with Multiple Nested Unordered/Ordered Lists
Do the following:
- Turn on your printer and make sure it is connected to your Windows 10 computer.
- Turn on your computer.
- Select > .
- Select Devices > Printers & scanners > Add a printer or scanner.
- Do one of the following:
- If your printer appears in the window, select it and select Add device. Windows installs a driver for your printer, and your printer appears in the Printers & scanners list.
- If your printer does not appear in the window, select The printer that I want isn't listed > Add a local printer or network printer with manual settings > Next. Then do the following:
- Select Use an existing port, and in the drop-down list to the right, select USB001 (Virtual printer port for USB).
- Select Next.
- In the Manufacturer column, select EPSON. In the Printers column, select your printer.
Note: If you do not see your printer, select Windows Update. After Windows has finished updating the list of printers, select Epson in the Manufacturer column and select your printer in the Printers column.
- Select Next.
- Modify the printer name, if desired, and select Next to install the printer.
- Select Do not share this printer and select Next.
Note: Others on your network will still be able to find and use the printer after you select this option.
- Select Print a test page to make sure the printer installed correctly.
- Select Close, then Finish.
- Select Use an existing port, and in the drop-down list to the right, select USB001 (Virtual printer port for USB).
- Test Test Test Test Test Test Test Test Test
======================================================
Images between paragraphs (not nested, with < br > after each line of text and image)
Open the ink tank unit cover, then remove the ink tank cap and place it in the holder shown here.

Note: Make sure the color of the ink tank label matches the ink color you want to refill, and only remove the cap from that ink tank. Be careful not to spill any ink.

Snap off the tip of the bottle cap, but do not dispose of it so you can use it to seal the bottle cap later, if necessary. Then remove the bottle cap and carefully remove the protective seal (avoid touching the ink underneath the seal). Close the bottle cap tightly.

Caution:
Close the bottle cap tightly; otherwise, ink may leak.Warning: If ink gets on your skin, wash it thoroughly with soap and water. If ink gets into your eyes, flush them immediately with water. If ink gets into your mouth, spit it out immediately. Seek medical advice if problems persist. Keep the ink bottles out of the reach of children and do not drink the ink.
======================================================
Images in Ordered List (nested in < li >, with < br > after each line of text and image)
- Open the ink tank unit cover, then remove the ink tank cap and place it in the holder shown here.
Note: Make sure the color of the ink tank label matches the ink color you want to refill, and only remove the cap from that ink tank. Be careful not to spill any ink.
- Snap off the tip of the bottle cap, but do not dispose of it so you can use it to seal the bottle cap later, if necessary. Then remove the bottle cap and carefully remove the protective seal (avoid touching the ink underneath the seal). Close the bottle cap tightly.
Caution:
Close the bottle cap tightly; otherwise, ink may leak.Warning: If ink gets on your skin, wash it thoroughly with soap and water. If ink gets into your eyes, flush them immediately with water. If ink gets into your mouth, spit it out immediately. Seek medical advice if problems persist. Keep the ink bottles out of the reach of children and do not drink the ink.
======================================================
Images in an Unordered List (nested in < li >, with < br > after each line of text and image)
Try the following:
- Make sure your system meets the requirements.

- Close any other programs, including screen savers and virus protection software, and install your product software again.

- If you see an error message or your software does not install correctly in Windows, you may not have software installation privileges. Contact your System Administrator.

- Make sure your product is turned on and the network cable is securely connected at both ends.
If these instructions did not solve your problem, contact Epson support.
======================================================
Tables
Lights 1 WiFi 2  power
power3  ink
ink4  paper
paperLight status Condition/solution The power light is onThe product is turned on. The power light is flashingThe product is busy. Wait for the power light to stop flashing before turning off the product.The power light is on The
ink light is onInitial ink charging may not be complete. See the Start Here sheet for instructions. The paper light is onNo paper is loaded or multiple sheets fed at one time. Load paper in the product, and press the  B&W copy button or the
  color copy button to clear the error.
The paper light is flashingPaper is jammed in the product. Remove the jammed paper, and press the B&W copy button or the color copy button to clear the error.The power light is flashing The
paper light is flashingAn ink pad is nearing or at the end of its service life. Contact Epson for support. If a message to continue printing appears on your computer, press the B&W copy button or the color copy button to continue printing.The power light is flashing The
ink light is flashingThe
paper light is flashingThe WiFi light is flashing green and orange
Open the scanner unit and remove any paper or protective materials inside the printer. Turn the product off and then back on again. The WiFi light is flashing orange A WiFi error has occurred. Press the Wi-Fi button to clear the error and try again. The ink light is flashing The
paper light is flashingThe WiFi light is flashing green and orange
An error has occurred during firmware updating. Connect your product using a USB cable and try updating the firmware again. If the error continues, contact Epson for support.
======================================================
In-line Relative Links
Paragraph
See our Epson iProjection for iOS Setup or Epson iProjection for Android Setup page for more instructions.
Ordered List
- See our Epson iProjection for iOS Setup page for more instructions.
- See one of the following pages for more instructions:
- See our Epson iProjection for Android Setup page for more instructions.
Unordered List:
- See our Epson iProjection for iOS Setup page for more instructions.
- Use Epson's iProjection app. See the setup instructions below for your device type.
- See our Epson iProjection for Android Setup page for more instructions.
======================================================
In-line External Links
Paragraph:
Yes. Epson America, Inc. and the National Cristina Foundation have joined together with the goal of helping those who are facing economic challenges or have a disability to gain access to today's technology.
Ordered List:
- Test Test Test Test Test Test Test Test Test Test Test Test
- Yes. Epson America, Inc. and the National Cristina Foundation have joined together with the goal of helping those who are facing economic challenges or have a disability to gain access to today's technology.
- Test Test Test Test Test Test Test Test Test Test Test Test
Unordered List:
- Test Test Test Test Test Test Test Test Test Test Test Test
- Yes. Epson America, Inc. and the National Cristina Foundation have joined together with the goal of helping those who are facing economic challenges or have a disability to gain access to today's technology.
- Test Test Test Test Test Test Test Test Test Test Test Test
======================================================
In-line PDF Links
Paragraph:
Select Complete and follow the on-screen instructions to save your settings and exit the menus. See Connecting the Projector and a Computer Directly Using Wireless Communication to connect your projector.
Ordered List:
- Select Search Access Point and press Enter.
- Make sure the computer is connected to the same wireless network as the projector. See Connecting to the Projector from the Software over a Network System to connect your projector.
Unordered List:
- Select Search Access Point and press Enter.
- Make sure the computer is connected to the same wireless network as the projector. See Connecting to the Projector from the Software over a Network System to connect your projector.
======================================================
Related Links
Test Test Test Test Test Test Test Test Test Test Test
Related concepts
Print Head Nozzle Check
Print Head Alignment
Print Head Cleaning
Related tasks
Selecting Basic Print Settings - Windows
Selecting Basic Print Settings - Mac
Selecting Printing Preferences - Mac
Selecting Additional Layout and Print Options - Windows
======================================================
Test FAQ 170057p: < p > around images
Try the following:- Make sure your product is turned on and securely connected to your computer or USB hub.
- If your product is connected to a USB hub, make sure it's connected to a first tier hub (the hub closest to the computer) that has its own A/C adapter when more than one hub is connected to the computer.
- Try restarting your computer.
- Make sure Epson Scan is set up correctly for your connection type. See the steps below:
- Make sure the product is turned on.
- Do one of the following:
- Windows 8: Navigate to the Start screen, right-click the screen, select All apps, then select EPSON Scan Settings.
- Windows (other versions): Click Start or
 , and select Programs or All Programs. Select EPSON Scan > EPSON Scan Settings (or EPSON, then EPSON Scan, and then EPSON Scan Settings.)
 - Mac: Search for EPSON Scan Settings, then click EPSON Scan Settings to open it.
- If you see the screen below, click No. The screen may appear twice.

- Make sure the correct scanner is selected.
- Do one of the following:
- If the product is connected to your computer with a USB cable, make sure the Connection setting is set to Local, then skip the remaining steps.
- If the product is set up on a network, make sure the Connection setting is set to Network and your scanner appears under Network Scanner Address with the correct IP address, if these settings are correct, skip the remaining steps. If the IP address for your product does not appear, click Add.

Note: If you don't know your product's IP address, print a Confirm Network Settings page from the printer's control panel. The IP address will appear on the page.
- Click Add.

- Select the IP address that appears in the list. If more than one IP address appears, be sure to select the one that matches your product's IP address.
- If you have a firewall or Internet security software installed, the search feature may not work correctly. In this case, click Enter address, and enter the IP address manually.
- Click OK.
- Click OK again to close the Epson Scan settings window.
If the steps above do not help, try the following.
- Windows 7 and Windows Vista:
- Turn off the printer.
- Uninstall Epson Scan.
- Restart your computer.
- Open Windows Explorer (right-click , then select Explore or Open Windows Explorer).
- Navigate to C:\Windows
- Locate the twain_32 folder and rename it to a different name such as twain_32_old.
- Restart your computer.
- Reinstall Epson Scan.
- Windows (other versions) or Mac: Uninstall and reinstall the Epson Scan software.
======================================================
Test FAQ 170057b: < br > before and after each image
Try the following:- Make sure your product is turned on and securely connected to your computer or USB hub.
- If your product is connected to a USB hub, make sure it's connected to a first tier hub (the hub closest to the computer) that has its own A/C adapter when more than one hub is connected to the computer.
- Try restarting your computer.
- Make sure Epson Scan is set up correctly for your connection type. See the steps below:
- Make sure the product is turned on.
- Do one of the following:
- Windows 8: Navigate to the Start screen, right-click the screen, select All apps, then select EPSON Scan Settings.
- Windows (other versions): Click Start or , and select Programs or All Programs. Select EPSON Scan > EPSON Scan Settings (or EPSON, then EPSON Scan, and then EPSON Scan Settings.)
- Mac: Search for EPSON Scan Settings, then click EPSON Scan Settings to open it.
- If you see the screen below, click No. The screen may appear twice.
- Make sure the correct scanner is selected.
- Do one of the following:
- If the product is connected to your computer with a USB cable, make sure the Connection setting is set to Local, then skip the remaining steps.
- If the product is set up on a network, make sure the Connection setting is set to Network and your scanner appears under Network Scanner Address with the correct IP address, if these settings are correct, skip the remaining steps. If the IP address for your product does not appear, click Add.
Note: If you don't know your product's IP address, print a Confirm Network Settings page from the printer's control panel. The IP address will appear on the page.
- Click Add.
- Select the IP address that appears in the list. If more than one IP address appears, be sure to select the one that matches your product's IP address.
- If you have a firewall or Internet security software installed, the search feature may not work correctly. In this case, click Enter address, and enter the IP address manually.
- Click OK.
- Click OK again to close the Epson Scan settings window.
If the steps above do not help, try the following.
- Windows 7 and Windows Vista:
- Turn off the printer.
- Uninstall Epson Scan.
- Restart your computer.
- Open Windows Explorer (right-click , then select Explore or Open Windows Explorer).
- Navigate to C:\Windows
- Locate the twain_32 folder and rename it to a different name such as twain_32_old.
- Restart your computer.
- Reinstall Epson Scan.
- Windows (other versions) or Mac: Uninstall and reinstall the Epson Scan software.
======================================================
Test FAQ 293442
Follow the instructions below for your operating system.Uninstalling Printing Software - Standard Epson Printer Software - Windows
You can uninstall and then re-install your printer software to solve certain problems.Note: You cannot uninstall the PostScript printer software.
- Turn off the product.
- Disconnect any interface cables.
- Do one of the following:
- Windows 10: Right-click
 and select Control Panel > Programs > Programs and Features. Select the uninstall option for your Epson product, then select Uninstall/Change.
 Note: If you see a User Account Control window, click Yes or Continue.
Select your product again, if necessary, then select OK, and click Yes to confirm the uninstallation. - Windows 8.x: Navigate to the Apps screen and select Control Panel > Programs > Programs and Features. Select the uninstall option for your Epson product, then select Uninstall/Change.
Note: If you see a User Account Control window, click Yes or Continue.
In the next window, select your product, if necessary, and click OK. Then follow any on-screen instructions. - Windows (other versions): Click
 or Start, and select All Programs or Programs. Select Epson, select your product, then click EPSON Printer Software Uninstall.
 Note: If you see a User Account Control window, click Yes or Continue.
In the next window, select your product, if necessary, and click OK. Then follow any on-screen instructions.
- Windows 10: Right-click
- Restart your computer, then re-install your software.
Note: If you find that re-installing your product software does not solve a problem, contact Epson.
Uninstalling Product Software - OS X
In most cases, you do not need to uninstall your product software before re-installing it. However, you can download the Uninstaller utility from the Epson support website to uninstall your product software as described here.Note: If you find that re-installing your product software does not solve a problem, contact Epson.
- To download the Uninstaller utility, visit the Epson download site.
- Follow the instructions on the screen to install the Uninstaller utility.
- Quit all applications currently running on your Mac.
- Double-click the Uninstaller icon.
- Select the checkbox for each software program you want to uninstall.
- Click Uninstall.
- Follow the on-screen instructions to uninstall the software.
- Reinstall your product software.
Note: If you uninstall the printer driver and your product name remains in the Print & Fax, Print & Scan, or Printers & Scanners window, select your product name and click the – (remove) icon to remove it.
======================================================
Test FAQ 295462
See below for the type of equipment you are connecting.
Desktop computer
- If you are using a VGA connection, you can connect an external monitor to the projector to display on the projection screen and a computer screen simultaneously.
- If you are using an HDMI connection, you can use an HDMI splitter to connect the projector and an HDMI monitor.
PC Laptop
- If you are using a VGA or HDMI connection, your laptop may support the ability to display on the projection screen and your laptop simultaneously.
- Set up the laptop to display on an external monitor. Do the following:
- Hold down the laptop's Fn key and press the key labelled with a monitor icon or CRT/LCD. (See your laptop manual for details.) Wait a few seconds for an image to appear.
- To display on both the laptop's monitor and the projector, try pressing the same keys again.
- If the same image is not displayed by the laptop and projector, check the Windows Display utility to make sure the external monitor port is enabled and extended desktop mode is disabled. (See your computer or Windows manual for instructions.)
- If necessary, check your video card settings and set the multiple display option to Mirror or Duplicate.
Mac Laptop
Do the following:
- Open System Preferences.
- Click Displays.
- Click the Arrangement tab.
- Make sure the Mirror Displays checkbox is selected.
======================================================
Test FAQ 283349
Try the following:- Make sure your product is turned on and securely connected to your computer or USB hub.
- If your product is connected to a USB hub, make sure it's connected to a first tier hub (the hub closest to the computer) that has its own A/C adapter when more than one hub is connected to the computer.
- Restart your computer.
- Make sure Epson Scan is set up correctly for your connection type by following these steps:
- Make sure the product is turned on.
- Do one of the following:
- Windows 8.x: Navigate to the Apps screen, then select EPSON Scan Settings.
- Windows (other versions): Click Start or
 and select Programs or All Programs. Select EPSON Scan > EPSON Scan Settings (or EPSON > EPSON Scan > EPSON Scan Settings).
 - OS X: Open Applications, then select Epson software, double-click EPSON Scan Settings.
- If you see a EPSON Scan cannot be started window, click No. The window may appear twice.
- Make sure the correct scanner is selected.
- Do one of the following:
- If the product is connected to your computer with a USB cable, make sure the Connection setting is set to Local, then skip the remaining steps.
- If the product is set up on a network, make sure the Connection setting is set to Network and your scanner appears under Network Scanner Address with the correct IP address. If these settings are correct, skip the remaining steps. If the IP address for your product does not appear, go to the next step.

Note: If you don't know your product's IP address, you can print a network status sheet to obtain it.
- Click Add.

- Select the IP address that appears in the list. If more than one IP address appears, be sure to select the one that matches your product's IP address.
Note: If you have a firewall or Internet security software installed, the search feature may not work correctly. In this case, click Enter address and enter the IP address manually.
- Click OK.
- Click OK again to close the Epson Scan Settings window.
If the steps above do not help, try one of the following:
- Windows 8.x, Windows 7, or Windows Vista:
- Turn off the printer.
- Uninstall Epson Scan.
- Restart your computer.
- Do one of the following:
- Windows 8.x: Open File Explorer (navigate to the Apps screen, then select File Explorer).
- Windows 7 or Windows Vista: Open Windows Explorer (right-click , then select Explore or Open Windows Explorer).
- Navigate to C:\Windows
- Locate the twain_32 folder and rename it to a different name such as twain_32_old.
Note: If you have third-party software installed in the twain_32 folder, you may need to reinstall the software.
- Restart your computer.
- Reinstall Epson Scan.
- Windows XP or OS X: Uninstall and reinstall Epson Scan.
======================================================
Test FAQ 278761
Try the following:- Perform GPS positioning by pressing the C button on the time screen. The product sets the time automatically during GPS positioning.
- Make sure the product is fully charged. If the battery charge runs low, the time may be incorrect.
- Change the DST setting in the Sys. Settings menu. If your area is currently on Daylight Saving Time, set the DST setting to ON. If your area is not on Daylight Saving Time, set the setting to OFF.
- Check the Time Zone setting in the Sys. Settings menu. If you traveled into a different time zone and the Time Zone setting is set to Manual, you need to manually adjust the time by doing the following:
- Press and hold the B button on the time screen until the Settings screen appears.

- Press the C or D button to highlight Sys. Settings, then press the A button.
- Select Time Zone, then press the A button.
- Select Manual, then press the A button.
- Press the C or D button to select the time difference between the time zone you’ve just entered and the one you left. For instance, if the new time zone is 3 hours ahead of the old time zone, select +3:00, then press the A button.
- Select
 Back as necessary to return to the time screen.
- Press and hold the B button on the time screen until the Settings screen appears.
Note: To have the time automatically change when you travel between time zones, set the Time Zone setting to Auto.
======================================================
Test FAQ 267521
Do the following:- Press the Menu button, select the Extended menu, and press Enter.
- Select the Display setting and press Enter.
- Select Pen Mode Icon and press Enter.
- Select Off and press Enter.
- Press Menu or Esc to exit the menus.
Projector Setup Settings - Extended Menu