How do I change the Sleep Timer setting?
-
Follow the instructions below.
Changing the Sleep Timer Setting From the Touch Panel
You can use the product's touch panel to change the time period before the product enters sleep mode.- Press the
 home button if necessary.
 - Select Eco Mode.
- Select Sleep Timer.

- Select the time period you want.
- Press the home button to exit.
Changing the Sleep Timer Setting - Windows
You can use the printer software to change the time period before the printer enters sleep mode.- Do one of the following:
- Windows 8: Open the Charms bar and select Settings. Select Control Panel and then select View Devices and Printers. Right-click your product name and select Printing Preferences.
- Windows 7: Click
 and select Devices and Printers. Right-click your product name and select Printing Preferences.
 - Windows Vista: Click and select Control Panel. Click Printer under Hardware and Sound, right-click your product name, and select Printing Preferences.
- Windows XP:Click Start and select Printers and Faxes. (Or open the Control Panel, select Printers and Other Hardware if necessary,and select Printers and Faxes.) Right-click your product name and select Printing Preferences.
- Click the Maintenance tab.
- Click the Printer and Option Information button You see the Printer and Option Information screen:

- Select the time period you want as the Sleep Timer setting and click Send.
- Click OK to close the open program windows.
Changing the Sleep Timer Setting - Mac OS X
You can use the printer software to change the time period before the printer enters sleep mode.- Do one of the following:
- Mac OS X 10.6/10.7/10.8: In the Apple menu or the Dock, select System Preferences. Select Print & Fax or Print & Scan, select your product, and select Options & Supplies. Select Utility and select Open Printer Utility.
- Mac OS X 10.5: In the Apple menu or the Dock, select System Preferences. Select Print & Fax, select your product, and select Open Print Queue or Print Queue. Select Utility.
- Select Printer Settings. You see this screen:
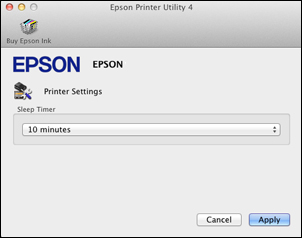
- Select the time period you want as the Sleep Timer setting.
- Click Apply.
- When you see the confirmation message, click Yes, then close the Printer Settings window.
- Press the
Published: Mar 13, 2013
Was this helpful? Thank you for the feedback!