How do I replace an ink cartridge?
-
Follow the steps below to replace an ink cartridge:
1. Make sure the printer is on but not printing. Raise the printer cover, then press down the Ink Replacement button until the print heads move towards the center.
2. Pull up the empty ink cartridge clamp all the way. The cartridge rises up from its holder and should be disposed.
3. Unwrap the new ink cartridge, being careful not to touch the green chip on the back of the cartridge, then remove ONLY the yellow tape seal from the top of the cartridge. If you accidentally remove anything but the yellow seal you cannot use the cartridge or it will damage the printer.
4. To install the new cartridge, tilt the ink cartridge forward slightly as you lower it into its holder. Hang the tabs at the back of the cartridge on the hooks on the holder clamps. Don't place the cartridge tabs under the hooks on the holder clamp; you may damage the clamp when you close it.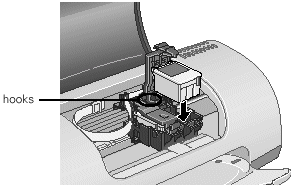
5. Install the ink cartridge and press the Ink Replacement button to begin charging the ink delivery system.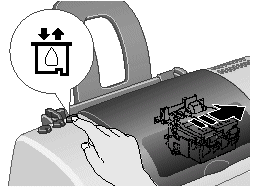
6. Charging takes about a minute and is complete when the power light stops flashing and the error light goes out. For more information on installing an ink cartridge please refer to your Start Here Poster or your Printer Basics Manual.
Was this helpful? Thank you for the feedback!