How do I access a memory card inserted in my product over a network connection?
-
Before you can access the memory card, make sure your printer is connected to the network and the printer software is installed on the computer. Then follow these steps:
- Insert a memory card in your printer's memory card slot.
- Do one of the following:
- Windows:
Click Start or , then click My Computer or Computer. Double-click the removable disk icon for the memory card.
 - Macintosh:
Double-click the removable disk icon for the memory card.
- Windows:
Windows Vista or XP- Print a Network Status Sheet.
- Open Windows Explorer.
- Select Map Network Drive from the toolbar (Windows Vista) or Tools menu (Windows XP or 2000). A Map Network Drive window appears.

- Select the drive letter you want to assign to the network drive.
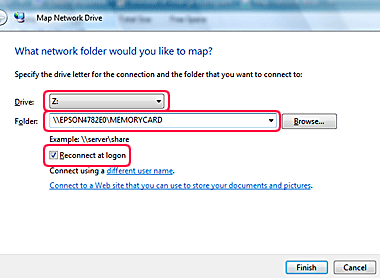
- Enter the following in the Folder field: \\servername\sharename
Refer to the printed network status sheet for the “servername' and “sharename”.- servername = Host Name or Printer Name (e.g., EPSONXXXXXX, where XXXXXX is the last 6 digits of the printer's MAC address)
- sharename = File Share Name (default is MEMORYCARD)
- Place a check mark in the box to the left of Reconnect at Logon.
- Click Finish.
If a Connect to EPSONXXXXXX window appears, select the appropriate user name and click OK to connect to the printer.
- Open the Hard Drive.
- Select Applications > EpsonNet Setup > EpsonNet Setup > Epson Stylus NX510 Network Setup. An EpsonNet Setup window appears.
- Follow the prompts until you see this screen. Select Computer settings only and click Next.

- Click Change Settings.

- Click Save.

- Select where you would like install the application, then click Save.

- Click Finish.
Published: Jun 11, 2009
Was this helpful? Thank you for the feedback!