My product is printing blank pages. What should I do?
-
Several factors may cause the product to print blank pages, such as print settings, low ink, or the product itself.
Check the following:
- Make sure the product is placed on a flat, stable surface that extends beyond the base in all directions. The product won't operate properly if it's tilted or at an angle.
- If the ink cartridges are old or low on ink, you may need to replace them.
- Make sure the yellow tape was removed from the ink cartridge(s) installed in your product.
- Make sure you're using paper that meets the product's specifications.
Note: Transparencies, hole-punched paper, and vellum paper are not supported.
If you still see blank pages, make a copy of a document or photo and do one of the following:
- If the copy is blank, print a nozzle check pattern to see if any of the nozzles are clogged. Clean the print head, if necessary.
- If the copy is fine, check the following:
- Make sure the paper size, orientation, and layout settings in your printer software are correct.
- Make sure your document does not contain blank pages. If your printer software has a Preview option, you can check for blank pages before you print and remove them, if necessary.
- If you're printing from Windows or a Mac, you can select Skip Blank Page in your printer software. To select the setting, follow the steps below for your operating system.
Windows
- Do one of the following:
- Windows 10: Click
 and select
  (Settings) > Devices > Printers & scanners. Select your printer and select Manage > Printing preferences.
 - Windows 8.x: Navigate to the Apps screen and select Control Panel > Hardware and Sound > Devices and Printers. Right-click your printer and select Printing Preferences.
- Windows 7: Click
 and select Devices and Printers. Right-click your printer and select Printing Preferences.
 - Windows Vista: Click and select Control Panel (or point to Settings and select Control Panel). Select Printer (under Hardware and Sound) or Printers. Right-click your printer and select Printing Preferences.
- Windows XP: Click Start and select Control Panel (or point to Settings and select Control Panel). Select Printers and Other Hardware (if available) and then Printers and Faxes. Right-click your printer and select Printing Preferences.
- Windows 10: Click
- Click the Maintenance tab and click the Extended Settings button.
- Select Skip Blank Page.
- Click OK as necessary to save your settings.
Mac
- Open the
 menu and select System Preferences.
 - Select Print & Scan, Print & Fax, or Printers & Scanners, select your product, and then select Options & Supplies.
- Select Driver or Options.
You see this screen:
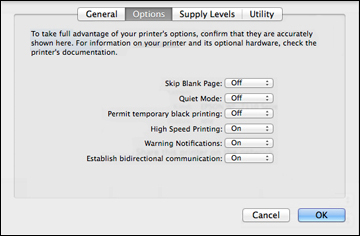
- Set Skip Blank Page to On.
- Click OK.
Print Head Nozzle Check
Print Head Cleaning
Published: Jun 8, 2017
Was this helpful? Thank you for the feedback!